かんたんデザイン編集コンポーネント利用例
テンプレートをかんたんデザイン編集に対応するためには、様々なコンポーネント(編集ボタンなどかんたんデザイン編集をするための部品)を設定する必要があります。
実際のテーマの対応を例に、具体的なコンポーネントのソースコードの例を紹介します。各属性値の詳細についてはかんたんデザイン編集仕様詳細もご覧ください。
目次
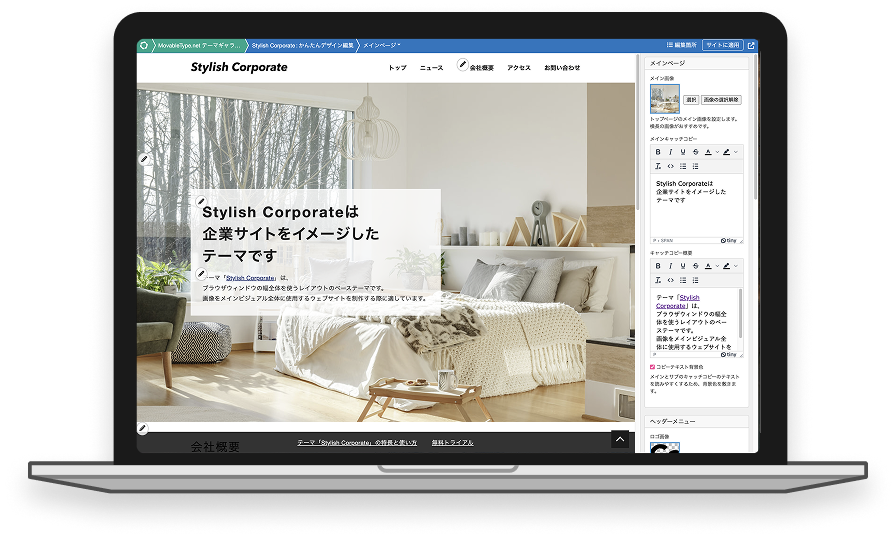
StylishCorporateテーマの例
ヘッダー:ロゴ画像
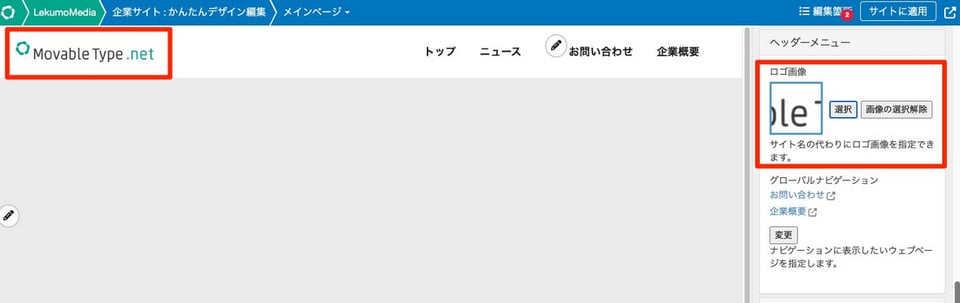
設定パネルのソースコード:
<mt:SetVarBlock name="blog_name"><$mt:BlogName encode_html="1"$></mt:SetVarBlock>
<$mt:Var name="logo" editor:type="image" editor:mode="editor" editor:update:attribute="src" editor:update:selector=".mt-navbar-brand img, .footerlogo__wrap img" editor:label="ロゴ画像" editor:description="サイト名の代わりにロゴ画像を指定できます。" editor:if:value="<img>" editor:if:empty="$blog_name"$>- name="logo"
変数名を指定します。 - editor:type="image"
タイプをimage(画像)に設定。 - editor:mode="editor"
editorの場合、変数値は出力されず、カスタム要素が挿入されます。本番環境では何も出力しません。 - editor:update:attribute="src"
変数値が更新されたときに更新するDOM要素の属性を設定しています。 - editor:update:selector=".mt-navbar-brand img, .footerlogo__wrap img"
更新対象とする要素を特定するためのCSSセレクタを設定します。 - editor:label="ロゴ画像"
設定項目のラベルを設定します。 - editor:description="サイト名の代わりにロゴ画像を指定できます。"
設定項目の説明を記述します。 - editor:if:value="<img>"
変数値が存在する場合に、指定された場所に設定値として渡されたHTMLを挿入します。 - editor:if:empty="$blog_name"
変数値が空であった場合に、指定された場所に設定値として渡されたHTMLを挿入します。今回はブログ(ウェブサイト)の名前をmt:SetVarBlockタグで変数にして指定しています。
テンプレート内のソースコード:
<!-- mt-site-editor-logo --><mt:If name="logo"><img src="<mt:Asset id="$logo"><$mt:AssetURL$></mt:Asset>" alt="<$mt:BlogName encode_html="1"$>"><mt:Else><!-- mt-site-editor-logo-if-empty --><$mt:BlogName encode_html="1"$><!-- /mt-site-editor-logo-if-empty --></mt:If><!-- /mt-site-editor-logo -->- <!-- mt-site-editor-logo -->~<!-- /mt-site-editor-logo -->
変数値が存在する場合に、指定された場所に設定値として渡されたHTMLを挿入します。logoの部分は今回の変数名になります。 - <!-- mt-site-editor-logo-if-empty --><$mt:BlogName encode_html="1"$><!-- /mt-site-editor-logo-if-empty -->
変数値が空であった場合に、指定された場所に設定値として渡されたHTMLを挿入します。logoの部分は今回の変数名になります。この例では画像がなかった場合はブログ(ウェブサイト)名を表示する、という処理をしています。
ヘッダー:グローバルナビゲーション(リスト形式のウェブページ一覧)
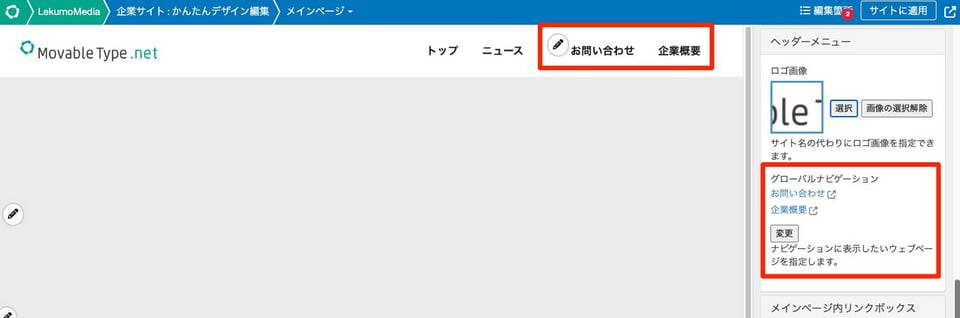
ウェブページ一覧をグローバルナビゲーションに表示する箇所は、テンプレート内と設定パネル両方で編集できるようになっています。
設定パネルのソースコード:
<mt:SetVarBlock name="page_item_html">
<li class="page_item"><a class="page_item__url page_item__title"></a></li>
</mt:SetVarBlock>
<$mt:Var name="page_ids" editor:type="list" editor:mode="editor" editor:label="グローバルナビゲーション" editor:description="ナビゲーションに表示したいウェブページを指定します。" editor:update:selector=".page_item" editor:register="0" editor:update:parent:selector=".mt-navbar-nav" editor:update:html="$page_item_html"$>- name="page_ids"
変数名を指定します。 - editor:type="list"
タイプをlist(リスト)に設定。 - editor:mode="editor"
editorの場合、変数値は出力されず、カスタム要素が挿入されます。本番環境では何も出力しません。 - editor:label="グローバルナビゲーション"
設定項目のラベルを設定します。 - editor:description="ナビゲーションに表示したいウェブページを指定します。"
設定項目の説明を記述します。 - editor:update:selector=".page_item"
更新対象とする要素を特定するためのCSSセレクタを設定します。 - editor:register="0"
このコンポーネントを右上メニューの項目として登録するかどうかを設定します。 テンプレート内と設定パネルの両方で編集できるようにしている場合に重複しないように0を設定しています。 - editor:update:parent:selector=".mt-navbar-nav"
新しいリスト項目を追加するときに、リスト項目を挿入する親要素を指定することができます。 - editor:update:html="$page_item_html"
用意したHTMLソースをeditor:update:parent:selectorで指定した要素に挿入します。今回はmt:SetVarBlockで指定したリストのHTMLが挿入されます。
テンプレート内のソースコード:
 <$mt:Var name="page_ids" editor:type="list" editor:mode="editor" editor:label="グローバルナビゲーション" editor:description="ナビゲーションに表示したいウェブページを指定します。" editor:update:selector=".page_item" editor:button:position="13,0" editor:update:parent:selector=".mt-navbar-nav" editor:update:html="$page_item_html"$>
          <mt:If name="page_ids">
            <mt:Pages ids="$page_ids">
  <li class="page_item"><a href="<$mt:PagePermalink$>" class="page_item__url page_item__title"><$mt:PageTitle encode_html=“1”$></a></li>
            </mt:Pages>
           </mt:If>
mt:Varの属性値について設定パネルで指定したものと重複していますが、以下が追加されています。
- editor:button:position="13,0"
編集ボタンの表示位置をtopとleftの値で調整できます。デフォルトの値からtopをマイナスにすると上に、leftをマイナスにすると左に移動します。
メインページ:メイン画像
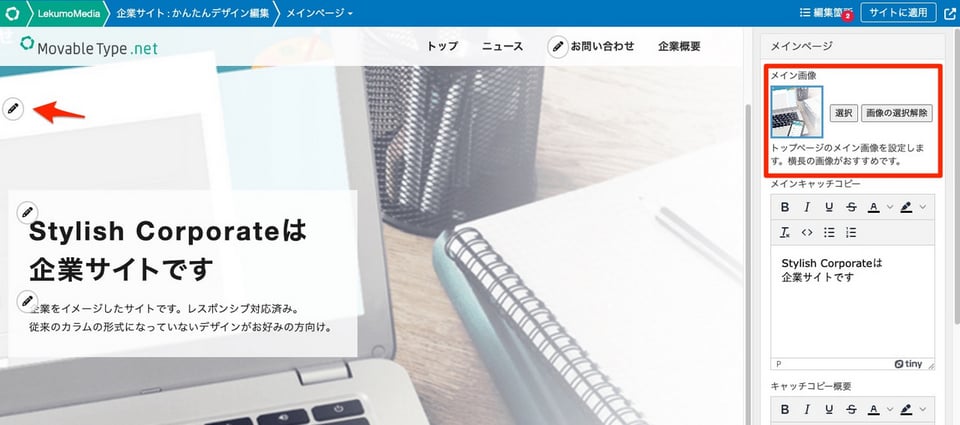
トップページのメイン画像は、テンプレート内と設定パネル両方で編集できるようになっています。
<$mt:Var name="asset_id" editor:type="image" editor:mode="editor" editor:update:selector=".jumbotron__indexImg" editor:update:attribute="style:backgroundImage" editor:label="メイン画像" editor:description="トップページのメイン画像を設定します。横長の画像がおすすめです。" editor:register="0"$>
- name="asset_id"
変数名を指定します。 - editor:type="image"
タイプをimage(画像)に設定。 - editor:mode="editor"
editorの場合、変数値は出力されず、カスタム要素が挿入されます。本番環境では何も出力しません。 - editor:update:selector=".jumbotron__indexImg"
更新対象とする要素を特定するためのCSSセレクタを設定します。 - editor:update:attribute="style:backgroundImage"
変数値が更新されたときに更新するDOM要素の属性を設定しています。 - editor:label="メイン画像"
設定項目のラベルを設定します。 - editor:description="トップページのメイン画像を設定します。横長の画像がおすすめです。"
設定項目の説明を記述します。 - editor:register="0"
このコンポーネントを右上メニューの項目として登録するかどうかを設定します。 テンプレート内と設定パネルの両方で編集できるようにしている場合に重複しないように0を設定しています。
テンプレート内のソースコード:
<div class="jumbotron mt-jumbotron jumbotron__indexImg"<mt:If name="asset_id"> style="background-image:url(<mt:Asset id="$asset_id"><$mt:AssetURL$></mt:Asset>);"<mt:Else><$mt:SetVar name="asset_id" value="1"$></mt:If>>
<$mt:Var name="asset_id" editor:type="image" editor:mode="editor" editor:update:selector=".jumbotron__indexImg" editor:update:attribute="style:backgroundImage" editor:label="メイン画像" editor:button:position="-270,5"$>
mt:Varの属性値について設定パネルで指定したものと重複していますが、以下が追加されています。
- editor:button:position="-270,5"
編集ボタンの表示位置をtopとleftの値で調整できます。デフォルトの値からtopをマイナスにすると上に、leftをマイナスにすると左に移動します。
メインページ:メインキャッチコピー、キャッチコピー概要
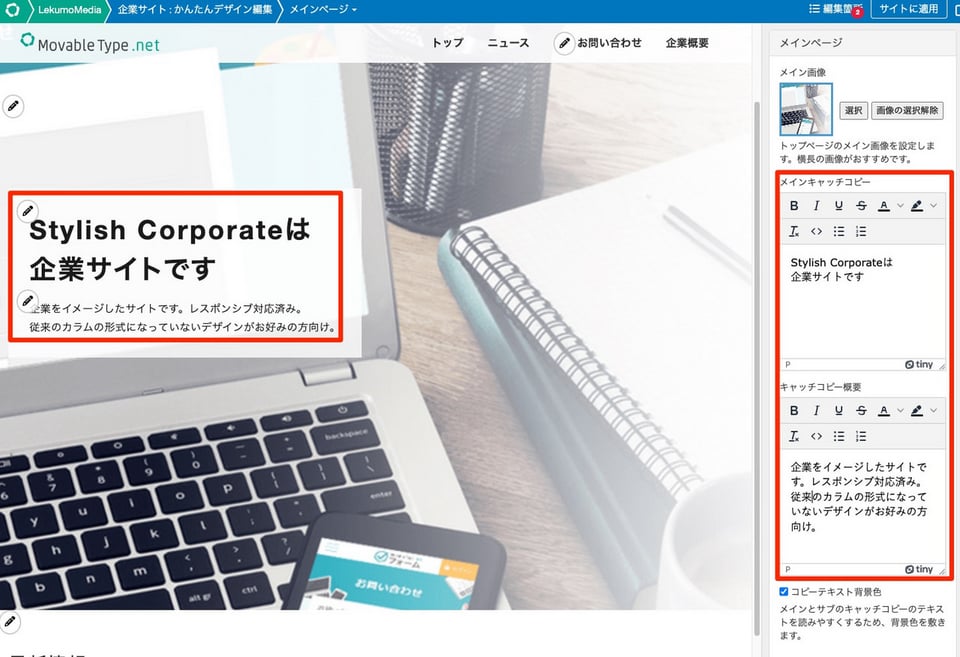
トップページのメインキャッチコピーとキャッチコピー概要は、テンプレート内と設定パネル両方で編集できるようになっています。どちらも同じ仕組みなのでソースコードの例はメインキャッチコピーを紹介します。
設定パネルのソースコード:
<$mt:Var name="mainlead__title" default="<p>Stylish Corporateは<br>企業サイトです</p>" editor:type="textarea" editor:label="メインキャッチコピー" editor:mode="editor" editor:editor="richtext" editor:register="0" editor:update:required="1"$>- name="mainlead__title"
変数名を指定します。 - default="<p>Stylish Corporateは<br>企業サイトです</p>"
デフォルトの値。変数に値が保存されていない場合に設定された値として参照されます。
この値は本番の環境でも同様に参照されます。 - editor:type="textarea"
入力フィールドとしてtextarea要素が表示されます。 - editor:label="メインキャッチコピー"
設定項目のラベルを設定します。 - editor:mode="editor"
editorの場合、変数値は出力されず、カスタム要素が挿入されます。本番環境では何も出力しません。 - editor:editor="richtext"
richtextに設定すると、入力フィールドがリッチテキストエディタになります。 - editor:register="0"
このコンポーネントを右上メニューの項目として登録するかどうかを設定します。 テンプレート内と設定パネルの両方で編集できるようにしている場合に重複しないように0を設定しています。 - editor:update:required="1"
更新が必要な項目として登録します。変数の値が変更されていない場合は、右上の編集箇所に数字が表示され項目の脇に(必須)ラベルが表示されます。
テンプレート内のソースコード:
<$mt:Var name="mainlead__title" default="<p>Stylish Corporateは<br>企業サイトです</p>" editor:type="contenteditable" editor:label="メインキャッチコピー" editor:mode="text" editor:button:position="-15, -20" editor:editor="richtext" editor:button:mode="before" editor:update:required="1"$>mt:Varの属性値について設定パネルで指定したものと重複していますが、以下が追加されています。
- editor:type="contenteditable"
editor:modeをtextの場合に利用できます。指定した要素を直接編集可能な状態にします。 - editor:button:position="-15, -20"
編集ボタンの表示位置をtopとleftの値で調整できます。デフォルトの値からtopをマイナスにすると上に、leftをマイナスにすると左に移動します。 - editor:button:mode="before"
編集ボタンの挿入位置を変数値の前か後ろのどちらかに指定できます。 この設定は editor:mode が text の場合にボタン位置の調整のために利用します。
メインページ:コピーテキスト背景色
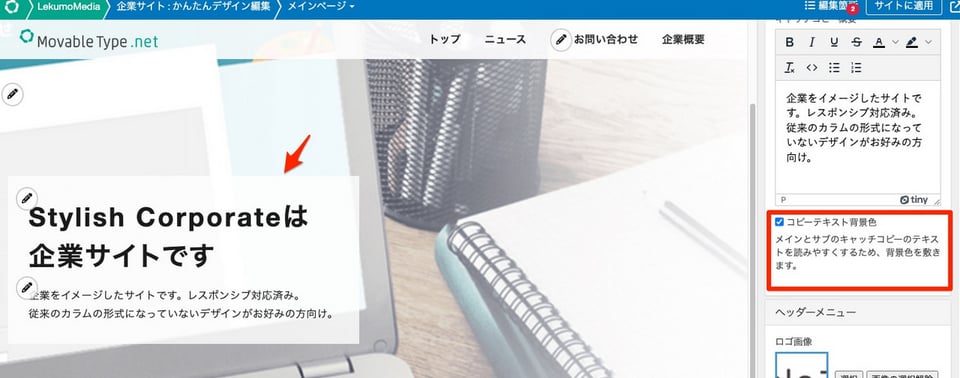
メインとサブのキャッチコピーのテキストを読みやすくするため、背景色を敷きます。設定パネルでチェックボックスでオンオフできるように実装しています。
設定パネルのソースコード:
<$mt:Var name="mainlead__block" editor:type="checkbox" editor:mode="editor" editor:label="コピーテキスト背景色" editor:description="メインとサブのキャッチコピーのテキストを読みやすくするため、背景色を敷きます。" editor:update:selector=".mainlead__block" editor:update:attribute="data-mt-site-editor-mainlead__block" editor:register="0" editor:update:required="1"$>
- name="mainlead__block"
変数名を指定します。 - editor:type="checkbox"
入力フィールドとしてcheckbox要素が表示されます。チェックを有効にすると1が変数値として保存され、無効にすると空欄が変数値として保存されます。 - editor:mode="editor"
editorの場合、変数値は出力されず、カスタム要素が挿入されます。本番環境では何も出力しません。 - editor:label="コピーテキスト背景色"
設定項目のラベルを設定します。 - editor:description="メインとサブのキャッチコピーのテキストを読みやすくするため、背景色を敷きます。"
設定項目の説明を記述します。 - editor:update:selector=".mainlead__block"
更新対象とする要素を特定するためのCSSセレクタを設定します。 - editor:update:attribute="data-mt-site-editor-mainlead__block"
変数値が更新されたときに更新するDOM要素の属性を設定しています。 - editor:register="0"
このコンポーネントを右上メニューの項目として登録するかどうかを設定します。 - editor:update:required="1"
更新が必要な項目として登録します。変数の値が変更されていない場合は、右上の編集箇所に数字が表示され項目の脇に(必須)ラベルが表示されます。
メインページ内リンクボックス:ウェブページ表示
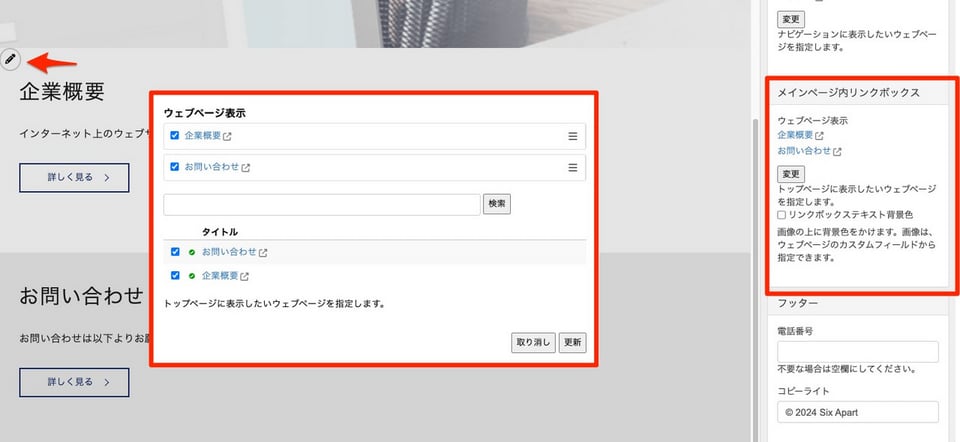
トップページに表示したいウェブページを指定します。
設定パネルのソースコード:
<$mt:Var name="webpage_ids" editor:type="list" editor:mode="editor" editor:label="ウェブページ表示" editor:description="トップページに表示したいウェブページを指定します。" editor:update:selector=".pagemenu__bgwrap" editor:register="0" editor:update:parent:selector=".pagemenu > .row" editor:update:fetch="1"$>- name="webpage_ids"
変数名を指定します。 - editor:type="list"
タイプをlist(リスト)に設定。 - editor:mode="editor"
editorの場合、変数値は出力されず、カスタム要素が挿入されます。本番環境では何も出力しません。 - editor:label="ウェブページ表示"
設定項目のラベルを設定します。 - editor:description="トップページに表示したいウェブページを指定します。"
設定項目の説明を記述します。 - editor:update:selector=".pagemenu__bgwrap"
更新対象とする要素を特定するためのCSSセレクタを設定します。 - editor:register="0"
このコンポーネントを右上メニューの項目として登録するかどうかを設定します。 テンプレート内と設定パネルの両方で編集できるようにしている場合に重複しないように0を設定しています。 - editor:update:parent:selector=".pagemenu > .row"
新しいリスト項目を追加するときに、リスト項目を挿入する親要素を指定することができます。 - editor:update:fetch="1"
1を指定すると、保存データに保存した後にプレビュー画面のHTMLを取得して、取得した内容を基にDOMを更新します。 DOMの更新には数秒の時間がかかるため、即座に更新したい箇所には不向きです。
テンプレート内のソースコード:
<$mt:Var name="webpage_ids" editor:type="list" editor:mode="editor" editor:label="ウェブページ表示" editor:description="トップページに表示したいウェブページを指定します。" editor:update:selector=".pagemenu__bgwrap" editor:update:parent:selector=".pagemenu > .row" editor:update:fetch="1"$>
<section class="pagemenu">
<div class="row mt-row">
<mt:If name="webpage_ids">
	<mt:Pages ids="$webpage_ids">
    <div class="col-sm-12 mt-col-sm-12 pagemenu__bgwrap"<mt:If name="pagemenu__bgwrap"> data-mt-site-editor-pagemenu__bgwrap="1"</mt:If><mt:If tag="CustomFieldValue" identifier="main_image_page"> style="background-image: url(<mt:CustomFieldAsset identifier="main_image_page"><$mt:AssetThumbnailURL width="800"$></mt:CustomFieldAsset>)</mt:If>">
      <article class="pagemenu__textwrap">
        <h3 class="pagemenu__bgwrap__title pagemenu__title"><$mt:PageTitle encode_html="1"$></h3>
        <div class="pagemenu__bgwrap__excerpt pagemenu__text wysiwyg" data-mh="my-group">
			<mt:If tag="CustomFieldValue" identifier="webpage_maintext">
        <$mt:CustomFieldValue identifier="webpage_maintext"$>
        <mt:ElseIf tag="PageExcerpt">
        <$mt:PageExcerpt$>
        <mt:Else>
        <$mt:PageBody convert_breaks=" 1" words="800"$>
        </mt:If>
      </div>
        <p class="pagemenu__button">
          <a href="<$mt:PagePermalink$>" class="btn btn-primary mt-btn-primary mt-btn-lg">詳しく見る</a>
        </p>
      </article>
    </div>
	</mt:Pages>
</mt:If>
</div>
</section>
mt:Varの属性値は設定パネルの項目と同じで、後は通常のMTタグによる実装になります。
フッター:電話番号、コピーライト
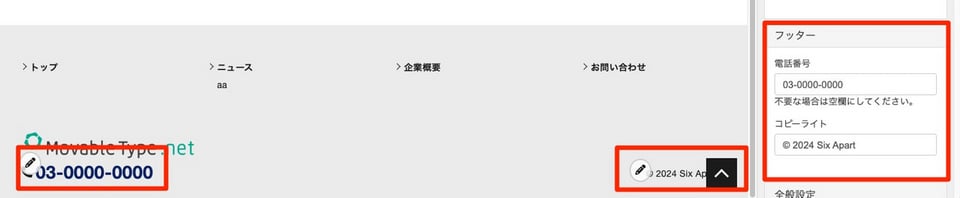
フッターの電話番号とコピーライトを変更できるようにしています。
設定パネルのソースコード:
<$mt:Var name="number" editor:type="text" editor:mode="editor" editor:label="電話番号" editor:description="不要な場合は空欄にしてください。" editor:update:required="1" editor:update:selector=".footerlogo__wrap" editor:update:fetch="1"$>
<$mt:Var name="copyright" default="© 2024 Six Apart" editor:type="text" editor:mode="editor" editor:label="コピーライト" editor:update:required="1"$>
- name="number"
変数名を指定します。 - editor:type="text"
入力フィールドとしてinput要素が表示されます。input要素のtype属性値はtextとなります。 - editor:mode="editor"
editorの場合、変数値は出力されず、カスタム要素が挿入されます。本番環境では何も出力しません。 - editor:label="電話番号"
設定項目のラベルを設定します。 - editor:description="不要な場合は空欄にしてください"
設定項目の説明を記述します。 - editor:update:required="1"
更新が必要な項目として登録します。変数の値が変更されていない場合は、右上の編集箇所に数字が表示され項目の脇に(必須)ラベルが表示されます。 - editor:update:selector=".footerlogo__wrap"
更新対象とする要素を特定するためのCSSセレクタを設定します。 - editor:update:fetch="1"
1を指定すると、保存データに保存した後にプレビュー画面のHTMLを取得して、取得した内容を基にDOMを更新します。 DOMの更新には数秒の時間がかかるため、即座に更新したい箇所には不向きです。
テンプレート内のソースコード:
<div class="footerlogo__wrap">
        <a href="<$mt:BlogRelativeURL$>"><!-- mt-site-editor-logo --><mt:If name="logo"><img src="<mt:Asset id="$logo"><$mt:AssetURL$></mt:Asset>" alt="<$mt:BlogName encode_html="1"$>"><mt:Else><!-- mt-site-editor-logo-if-empty --><$mt:BlogName encode_html="1"$><!-- /mt-site-editor-logo-if-empty --></mt:If><!-- /mt-site-editor-logo --></a>
<mt:If name="number">
    <p class="footer__number"><i class="fa-solid fa-phone"></i><a href="tel:<$mt:Var name="number"$>"><$mt:Var name="number" editor:type="contenteditable" editor:label="電話番号" editor:mode="text" editor:button:mode="before" editor:update:required="1" editor:button:position="-15,-25"$></a></p>
</mt:If>
  </div>
    <p class="copyarea__text"><$mt:Var name="copyright" default="© 2024 Six Apart" editor:type="contenteditable" editor:label="コピーライト" editor:mode="text" editor:button:mode="before" editor:update:required="1" editor:button:position="-15,-25"$></p>
mt:Varの属性値について設定パネルで指定したものと重複していますが、以下が追加されています。
- editor:type="contenteditable"
editor:modeをtextの場合に利用できます。指定した要素を直接編集可能な状態にします。 - editor:button:mode="before"
編集ボタンの挿入位置を変数値の前か後ろのどちらかに指定できます。 この設定は editor:mode が text の場合にボタン位置の調整のために利用します。 - editor:button:position="-15,-25"
編集ボタンの表示位置をtopとleftの値で調整できます。デフォルトの値からtopをマイナスにすると上に、leftをマイナスにすると左に移動します。
全般設定:デフォルトOGP画像
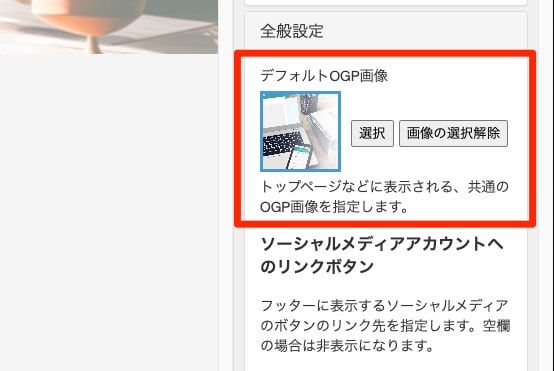
トップページなどに、共通のOGP画像を指定します。
設定パネルのソースコード:
<$mt:Var name="default_ogp_image" editor:type="image" editor:mode="editor" editor:label="デフォルトOGP画像" editor:description="トップページなどに表示される、共通のOGP画像を指定します。"$>- name="default_ogp_image"
変数名を指定します。 - editor:type="image"
タイプをimage(画像)に設定。 - editor:mode="editor"
editorの場合、変数値は出力されず、カスタム要素が挿入されます。本番環境では何も出力しません。 - editor:label="デフォルトOGP画像"
設定項目のラベルを設定します。 - editor:description="トップページなどに表示される、共通のOGP画像を指定します。"
設定項目の説明を記述します。
全般設定:ソーシャルメディアアカウントへのリンクボタン
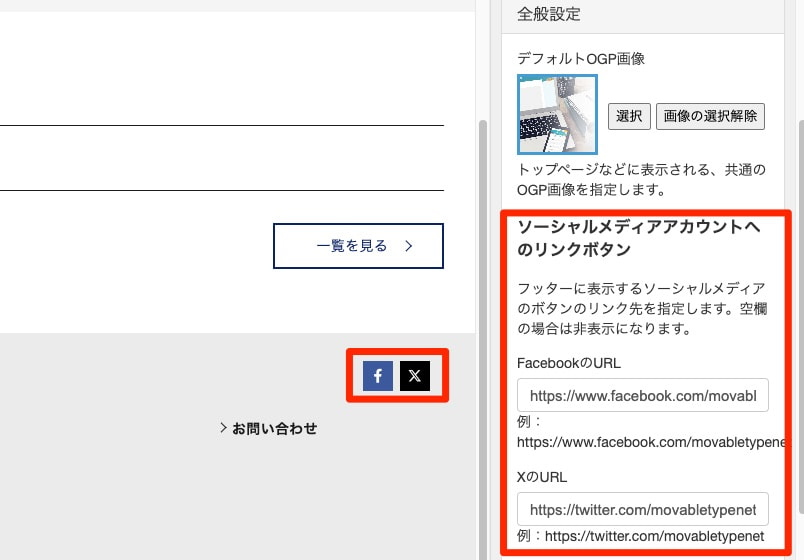
フッターに表示するソーシャルメディアのボタンのリンク先を指定します。空欄の場合は非表示になります。
設定パネルのソースコード:
<h3>ソーシャルメディアアカウントへのリンクボタン</h3>
<p>フッターに表示するソーシャルメディアのボタンのリンク先を指定します。空欄の場合は非表示になります。</p>
<$mt:Var name="facebook" editor:type="url" editor:mode="editor" editor:label="FacebookのURL" editor:description="例:https://www.facebook.com/movabletypenet" editor:update:selector=".footer-sns__wrap" editor:update:fetch="1"$>
<$mt:Var name="x-twitter" editor:type="url" editor:mode="editor" editor:label="XのURL" editor:description="例:https://twitter.com/movabletypenet" editor:update:selector=".footer-sns__wrap" editor:update:fetch="1"$>- name="facebook"
変数名を指定します。 - editor:type="url"
タイプをurlに設定。 - editor:mode="editor"
editorの場合、変数値は出力されず、カスタム要素が挿入されます。本番環境では何も出力しません。 - editor:label="FacebookのURL"
設定項目のラベルを設定します。 - editor:description="例:https://www.facebook.com/movabletypenet"
設定項目の説明を記述します。 - editor:update:selector=".footer-sns__wrap"
更新対象とする要素を特定するためのCSSセレクタを設定します。 - editor:update:fetch="1"
1を指定すると、保存データに保存した後にプレビュー画面のHTMLを取得して、取得した内容を基にDOMを更新します。 DOMの更新には数秒の時間がかかるため、即座に更新したい箇所には不向きです。
全般設定:ソーシャルメディアのアカウント情報
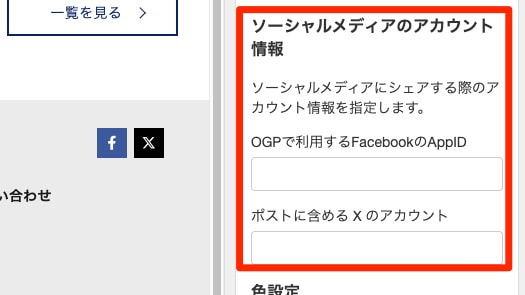
ソーシャルメディアにシェアする際のアカウント情報を指定します。
設定パネルのソースコード:
<h3>ソーシャルメディアアカウントへのリンクボタン</h3>
<p>フッターに表示するソーシャルメディアのボタンのリンク先を指定します。空欄の場合は非表示になります。</p>
<$mt:Var name="facebook" editor:type="url" editor:mode="editor" editor:label="FacebookのURL" editor:description="例:https://www.facebook.com/movabletypenet"$>
<$mt:Var name="x-twitter" editor:type="url" editor:mode="editor" editor:label="XのURL" editor:description="例:https://twitter.com/movabletypenet"$>- name="facebook"
変数名を指定します。 - editor:type="url"
タイプをurlに設定。 - editor:mode="editor"
editorの場合、変数値は出力されず、カスタム要素が挿入されます。本番環境では何も出力しません。 - editor:label="FacebookのURL"
設定項目のラベルを設定します。 - editor:description="例:https://www.facebook.com/movabletypenet"
設定項目の説明を記述します。
全般設定:色設定
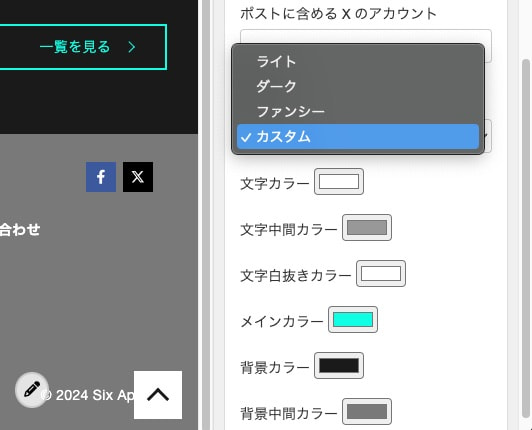
色設定でカラーセットの指定と各色のカスタム編集を行えます。項目は独自のインターフェースをHTML、CSS、JavaScriptを利用して実現しています。
設定パネルのソースコード:
<h3>色設定</h3>
<style>
[data-details] {
  margin-top: 15px;
}
select {
  width: 100%;
  box-sizing: border-box;
  height: 34px;
  padding: 6px 12px;
  color: #555;
  border-radius: 4px;
  border: 1px solid #ccc;
  font-size: 15px;
}
</style>
<color-settings>
<select></select>
<div data-details style="display: none">
<$mt:Var name="text_main_color" editor:type="color" editor:update:selector=":root" editor:update:attribute="style:--text_main_color" editor:mode="editor" editor:label="文字カラー"$>
<$mt:Var name="text_middle_color" editor:type="color" editor:update:selector=":root" editor:update:attribute="style:--text_middle_color" editor:mode="editor" editor:label="文字中間カラー"$>
<$mt:Var name="text_white_color" editor:type="color" editor:update:selector=":root" editor:update:attribute="style:--text_white_color" editor:mode="editor" editor:label="文字白抜きカラー"$>
<$mt:Var name="main_color" editor:type="color" editor:update:selector=":root" editor:update:attribute="style:--main_color" editor:mode="editor" editor:label="メインカラー"$>
<$mt:Var name="bg_color" editor:type="color" editor:mode="editor" editor:update:selector=":root" editor:update:attribute="style:--bg_color" editor:label="背景カラー"$>
<$mt:Var name="middle_color" editor:type="color" editor:update:selector=":root" editor:update:attribute="style:--middle_color" editor:mode="editor" editor:label="背景中間カラー"$>
</div>
</color-settings>
<script type="module">
const colorThemes = [
  {
    label: "ライト",
    values: {
      "text_main_color": "#1b1b1b",
      "text_middle_color": "#909090",
      "text_white_color": "#ffffff",
      "main_color": "#0a2363",
      "bg_color": "#ffffff",
      "middle_color": "#ebebeb",
    },
  },
  {
    label: "ダーク",
    values: {
      "text_main_color": "#ffffff",
      "text_middle_color": "#989898",
      "text_white_color": "#ffffff",
      "main_color": "#1affe4",
      "bg_color": "#1a1a1a",
      "middle_color": "#797979",
    },
  },
  {
    label: "ファンシー",
    values: {
      "text_main_color": "#4d4d4d",
      "text_middle_color": "#C7B2B8",
      "text_white_color": "#ffffff",
      "main_color": "#ff709b",
      "bg_color": "#ffffff",
      "middle_color": "#C9EEE6",
    },
  },
  {
    label: "カスタム",
  }
];

customElements.define(
  "color-settings",
  class extends HTMLElement {
    connectedCallback() {
      setTimeout(() => {
        const select = this.querySelector("select");
        const customThemeLabel = colorThemes.find((theme) => !theme.values)?.label;

        const details = this.querySelector("[data-details]");
        function updateDetails() {
          details.style.display = select.value === customThemeLabel ? "block" : "none";
        }

        const inputs = {};
        this.querySelectorAll(`input[type="color"]`).forEach((input) => {
          inputs[input.name] = input;
        });
        const inputsCount = Object.keys(inputs).length;

        let selected;
        for (const { label, values } of colorThemes) {
          const option = document.createElement("option");
          option.value = label;
          option.textContent = label;

          if (values
            && inputsCount === Object.keys(values).length
            && Object.keys(values).every((k) => inputs[k]?.value === values[k])) {
            selected = option.selected = true;
          }

          select.appendChild(option);
        }
        if (!selected) {
          select.value = customThemeLabel;
          updateDetails();
        }

        select.addEventListener("change", () => {
          updateDetails();

          const { values } = colorThemes.find((theme) => theme.label === select.value);
          if (!values) {
            return;
          }
          for (const k in values) {
            inputs[k].value = values[k];
          }
          Object.values(inputs)[0].dispatchEvent(new Event("input"));
        });
      }, 300);
    }
  }
);
</script>
ニュースヘッダー:ヘッダー画像
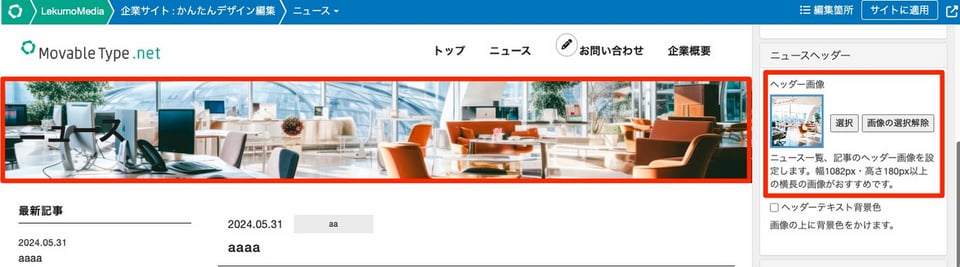
ニュース一覧、記事の共通ヘッダー画像を設定します。
設定パネルのソースコード:
<$mt:Var name="UnderlayerJumbotron__newsimg" editor:type="image" editor:mode="editor" editor:update:selector=".UnderlayerJumbotron__newsimg" editor:update:attribute="style:backgroundImage" editor:label="ヘッダー画像" editor:description="ニュース一覧、記事のヘッダー画像を設定します。幅1082px・高さ180px以上の横長の画像がおすすめです。"$>- name="UnderlayerJumbotron__newsimg"
変数名を指定します。 - editor:type="image"
タイプをimage(画像)に設定。 - editor:mode="editor"
editorの場合、変数値は出力されず、カスタム要素が挿入されます。本番環境では何も出力しません。 - editor:update:selector=".UnderlayerJumbotron__newsimg"
更新対象とする要素を特定するためのCSSセレクタを設定します。 - editor:update:attribute="style:backgroundImage"
変数値が更新されたときに更新するDOM要素の属性を設定しています。 - editor:label="ヘッダー画像"
設定項目のラベルを設定します。 - editor:description="ニュース一覧、記事のヘッダー画像を設定します。幅1082px・高さ180px以上の横長の画像がおすすめです。"
設定項目の説明を記述します。
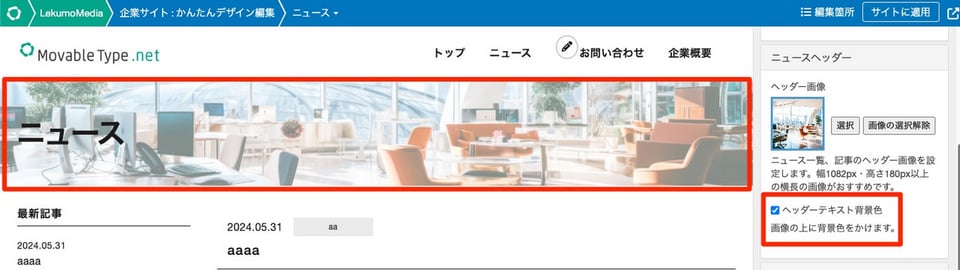
ニュースヘッダー:ヘッダーテキスト背景色
設定パネルのソースコード:
<$mt:Var name="UnderlayerJumbotron__bgcolor" editor:type="checkbox" editor:mode="editor" editor:label="ヘッダーテキスト背景色" editor:description="画像の上に背景色をかけます。" editor:update:selector=".UnderlayerJumbotron__newsimg" editor:update:attribute="data-mt-site-editor-UnderlayerJumbotron__newsimg" editor:register="0"$>
- name="UnderlayerJumbotron__bgcolor"
変数名を指定します。 - editor:type="checkbox"
入力フィールドとしてcheckbox要素が表示されます。チェックを有効にすると1が変数値として保存され、無効にすると空欄が変数値として保存されます。 - editor:mode="editor"
editorの場合、変数値は出力されず、カスタム要素が挿入されます。本番環境では何も出力しません。 - editor:label="ヘッダーテキスト背景色"
設定項目のラベルを設定します。 - editor:description="画像の上に背景色をかけます。"
設定項目の説明を記述します。 - editor:update:selector=".UnderlayerJumbotron__newsimg"
更新対象とする要素を特定するためのCSSセレクタを設定します。 - editor:update:attribute="data-mt-site-editor-UnderlayerJumbotron__newsimg"
変数値が更新されたときに更新するDOM要素の属性を設定しています。 - editor:register="0"
このコンポーネントを右上メニューの項目として登録するかどうかを設定します。
ニュース記事一覧:記事の1ページの表示件数
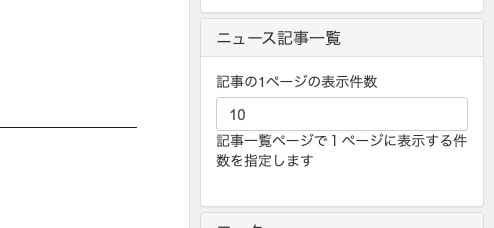
記事一覧の1ページの表示件数を数字で指定します。単純に変数として保存され、利用されます。
設定パネルのソースコード:
<$mt:Var name="paginate" default="10" editor:type="number" editor:mode="editor" editor:label="記事の1ページの表示件数" editor:description="記事一覧ページで1ページに表示する件数を指定します" editor:update:selector=".newslist" editor:update:fetch="1"$>
- name="paginate"
変数名を指定します。 - default="10"
デフォルトの値。変数に値が保存されていない場合に設定された値として参照されます。 - editor:type="number"
タイプをnumberに設定。 - editor:mode="editor"
editorの場合、変数値は出力されず、カスタム要素が挿入されます。本番環境では何も出力しません。 - editor:label="記事の1ページの表示件数"
設定項目のラベルを設定します。 - editor:description="記事一覧ページで1ページに表示する件数を指定します"
設定項目の説明を記述します。 - editor:update:selector=".newslist"
更新対象とする要素を特定するためのCSSセレクタを設定します。 - editor:update:fetch="1"
1を指定すると、保存データに保存した後にプレビュー画面のHTMLを取得して、取得した内容を基にDOMを更新します。 DOMの更新には数秒の時間がかかるため、即座に更新したい箇所には不向きです。
記事:ソーシャルシェアボタン
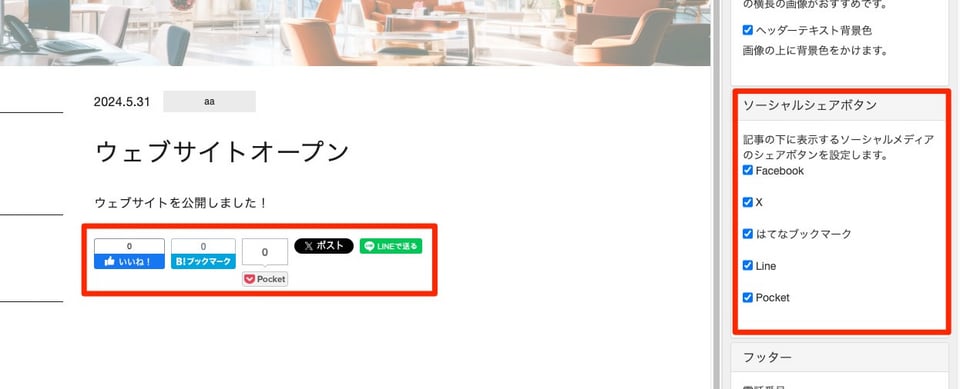
記事の下に表示するソーシャルメディアのシェアボタンを設定します。
設定パネルのソースコード:
記事の下に表示するソーシャルメディアのシェアボタンを設定します。
<$mt:Var name="socialButtonFacebook" editor:type="checkbox" editor:mode="editor" editor:label="Facebook" editor:if:value='<li class="entry-social-facebook"><div class="fb-like" data-layout="box_count" data-action="like" data-show-faces="false" data-share="false"></div></li>' editor:if:empty=""$>
<$mt:Var name="socialButtonX-Twitter" editor:type="checkbox" editor:mode="editor" editor:label="X" editor:if:value='<li class="entry-social-x-twitter"><a href="https://x.com/intent/post" class="twitter-share-button" data-lang="ja" data-count="vertical">ポスト</a></li>' editor:if:empty=""$>
<$mt:Var name="socialButtonHatena" editor:type="checkbox" editor:mode="editor" editor:label="はてなブックマーク" editor:if:value='<li class="entry-social-hatena"><a href="http://b.hatena.ne.jp/entry/" class="hatena-bookmark-button" data-hatena-bookmark-layout="vertical-balloon" data-hatena-bookmark-lang="ja" title="このエントリーをはてなブックマークに追加"><img src="https://b.st-hatena.com/images/entry-button/button-only@2x.png" alt="このエントリーをはてなブックマークに追加" width="20" height="20" style="border: none;" /></a></li>' editor:if:empty=""$>
<$mt:Var name="socialButtonLine" editor:type="checkbox" editor:mode="editor" editor:label="Line" editor:if:value='<li class="entry-social-line"><span><div class="line-it-button" style="display: none;" data-type="share-a" data-lang="ja"></div></span></li>' editor:if:empty=""$>
<$mt:Var name="socialButtonPocket" editor:type="checkbox" editor:mode="editor" editor:label="Pocket" editor:if:value='<li class="entry-social-pocket"><a data-pocket-label="pocket" data-pocket-count="vertical" class="pocket-btn" data-lang="en"></a></li>' editor:if:empty=""$>
- name="socialButtonFacebook"
変数名を指定します。 - editor:type="checkbox"
入力フィールドとしてcheckbox要素が表示されます。チェックを有効にすると1が変数値として保存され、無効にすると空欄が変数値として保存されます。 - editor:mode="editor"
editorの場合、変数値は出力されず、カスタム要素が挿入されます。本番環境では何も出力しません。 - editor:label="Facebook"
設定項目のラベルを設定します。 - editor:if:value='<li class="entry-social-facebook"><div class="fb-like" data-layout="box_count" data-action="like" data-show-faces="false" data-share="false"></div></li>' editor:if:empty=""
変数値が存在する場合に、指定された場所に設定値として渡されたHTMLを挿入します。 - editor:if:empty=""
変数値が空であった場合に、指定された場所に設定値として渡されたHTMLを挿入します。
テンプレート内のソースコード:
  <!-- mt-site-editor-socialButtonFacebook--><mt:If name="socialButtonFacebook">
   〜
</mt:If><!-- /mt-site-editor-socialButtonFacebook-->- <!-- mt-site-editor-socialButtonFacebook -->~<!-- /mt-site-editor-socialButtonFacebook -->
変数値が存在する場合に、指定された場所に設定値として渡されたHTMLを挿入します。socialButtonFacebookの部分は今回の変数名になります。
ウェブページ:ヘッダー画像
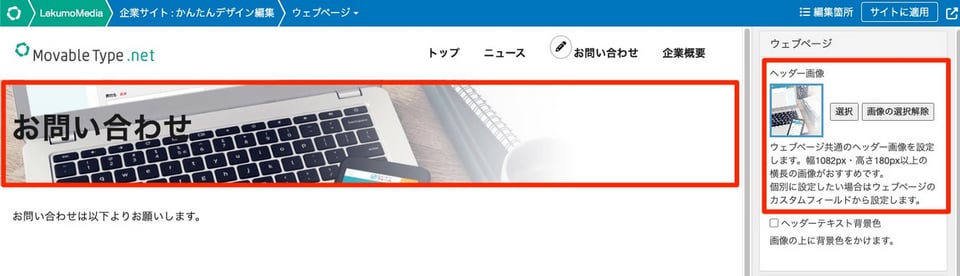
ウェブページ共通のヘッダー画像を設定します。
設定パネルのソースコード:
<$mt:Var name="UnderlayerJumbotron__webpageimg" editor:type="image" editor:mode="editor" editor:update:selector=".UnderlayerJumbotron__webpageimg" editor:update:attribute="style:backgroundImage" editor:label="ヘッダー画像" editor:description="ウェブページ共通のヘッダー画像を設定します。幅1082px・高さ180px以上の横長の画像がおすすめです。<br>個別に設定したい場合はウェブページのカスタムフィールドから設定します。"$>- name="UnderlayerJumbotron__webpageimg"
変数名を指定します。 - editor:type="image"
タイプをimage(画像)に設定。 - editor:mode="editor"
editorの場合、変数値は出力されず、カスタム要素が挿入されます。本番環境では何も出力しません。 - editor:update:selector=".UnderlayerJumbotron__webpageimg"
更新対象とする要素を特定するためのCSSセレクタを設定します。 - editor:update:attribute="style:backgroundImage"
変数値が更新されたときに更新するDOM要素の属性を設定しています。 - editor:label="ヘッダー画像"
設定項目のラベルを設定します。 - editor:description="ウェブページ共通のヘッダー画像を設定します。幅1082px・高さ180px以上の横長の画像がおすすめです。<br>個別に設定したい場合はウェブページのカスタムフィールドから設定します。"
設定項目の説明を記述します。
ウェブページ:ヘッダーテキスト背景色
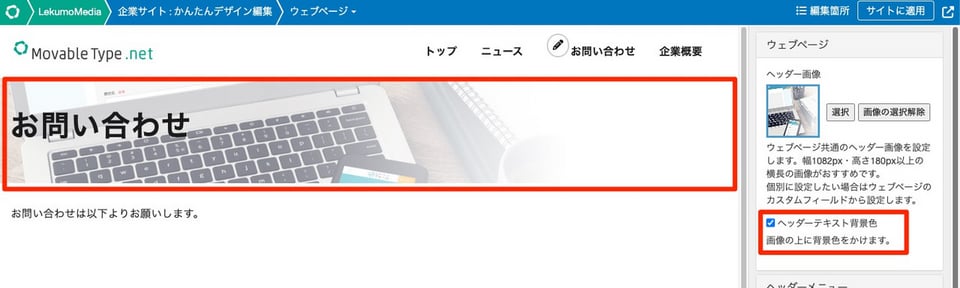
画像の上に背景色を設定します。
設定パネルのソースコード:
<$mt:Var name="UnderlayerJumbotron__bgcolor" editor:type="checkbox" editor:mode="editor" editor:label="ヘッダーテキスト背景色" editor:description="画像の上に背景色をかけます。" editor:update:selector=".UnderlayerJumbotron__webpageimg" editor:update:attribute="data-mt-site-editor-UnderlayerJumbotron__bgcolor" editor:register="0"$>- name="UnderlayerJumbotron__bgcolor"
変数名を指定します。 - editor:type="checkbox"
入力フィールドとしてcheckbox要素が表示されます。チェックを有効にすると1が変数値として保存され、無効にすると空欄が変数値として保存されます。 - editor:mode="editor"
editorの場合、変数値は出力されず、カスタム要素が挿入されます。本番環境では何も出力しません。 - editor:label="ヘッダーテキスト背景色"
設定項目のラベルを設定します。 - editor:description="画像の上に背景色をかけます。"
設定項目の説明を記述します。 - editor:update:selector=".UnderlayerJumbotron__webpageimg"
更新対象とする要素を特定するためのCSSセレクタを設定します。 - editor:update:attribute="data-mt-site-editor-UnderlayerJumbotron__bgcolor"
変数値が更新されたときに更新するDOM要素の属性を設定しています。 - editor:register="0"
このコンポーネントを右上メニューの項目として登録するかどうかを設定します。
LekumoMediaテーマの例
イメージスライダー:スライド設定
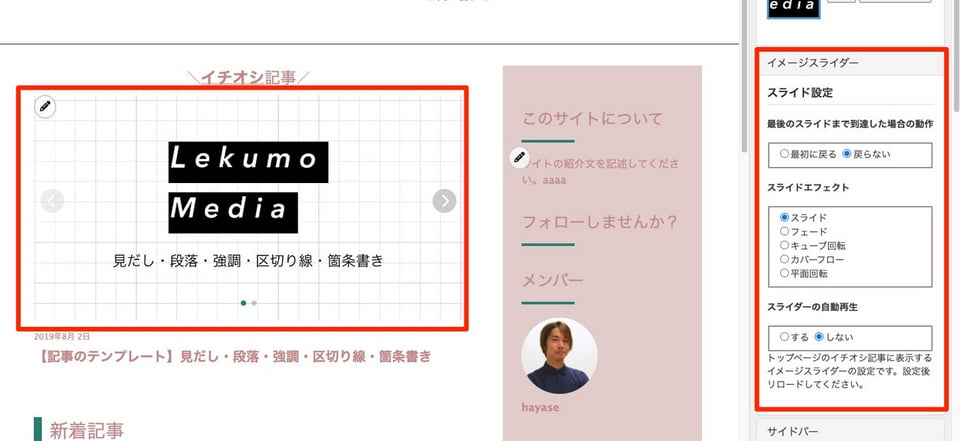
イメージスライダーの動作を変数を利用して設定します。
設定パネルのソースコード:
<template data-template-name="swipper">
  <swipper-loop>
    <h4>最後のスライドまで到達した場合の動作</h4>
    <$mt:Var name="swipper_loop" editor:type="hidden"$>
    <fieldset>
      <label
        ><input
          type="radio"
          name="swipper-loop"
          value="true"
        />最初に戻る</label
      >
      <label
        ><input type="radio" name="swipper-loop" value="false" />戻らない</label
      >
    </fieldset>
  </swipper-loop>
  <swipper-effect>
    <h4>スライドエフェクト</h4>
    <$mt:Var name="swipper_effect" editor:type="hidden"$>
    <fieldset>
      <label
        ><input
          type="radio"
          name="swipper-effect"
          value="slide"
        />スライド</label
      ><br>
      <label
        ><input
          type="radio"
          name="swipper-effect"
          value="fade"
        />フェード</label
      ><br>
       <label
        ><input
          type="radio"
          name="swipper-effect"
          value="cube"
        />キューブ回転</label
      ><br>
       <label
        ><input
          type="radio"
          name="swipper-effect"
          value="coverflow"
        />カバーフロー</label
      ><br>
       <label
        ><input
          type="radio"
          name="swipper-effect"
          value="flip"
        />平面回転</label
      >
      <!-- ここにエフェクトのラジオボックス追加する -->
    </fieldset>
  </swipper-effect>
 <swipper-autoplay>
    <h4>スライダーの自動再生</h4>
    <$mt:Var name="swipper_autoplay" editor:type="hidden"$>
    <fieldset>
      <label
        ><input
          type="radio"
          name="swipper-autoplay"
          value="true"
        />する</label
      >
      <label
        ><input type="radio" name="swipper-autoplay" value="false" />しない</label
      >
    </fieldset>
  </swipper-autoplay>
  <script>
    customElements.define(
      "swipper-loop",
      class extends HTMLElement {
        connectedCallback() {
          setTimeout(() => {
            const hiddenEditor = this.querySelector("mt-editor-hidden");
            const hidden = hiddenEditor.querySelector(`[name=swipper_loop]`);
            const fieldset = this.querySelector("fieldset");
            const radio = fieldset.querySelector(
              `input[value="${hidden.value}"]`
            );
            if (radio) {
              radio.checked = true;
            }
            fieldset.addEventListener("change", (ev) => {
              hidden.value = ev.target.value;
              setTimeout(() => {
                hidden.dispatchEvent(new Event("input"));
              });
            });
          }, 300);
        }
      }
    );
    customElements.define(
      "swipper-effect",
      class extends HTMLElement {
        connectedCallback() {
          setTimeout(() => {
            const hiddenEditor = this.querySelector("mt-editor-hidden");
            const hidden = hiddenEditor.querySelector(`[name=swipper_effect]`);
            const fieldset = this.querySelector("fieldset");
            const radio = fieldset.querySelector(
              `input[value="${hidden.value}"]`
            );
            if (radio) {
              radio.checked = true;
            }
            fieldset.addEventListener("change", (ev) => {
              hidden.value = ev.target.value;
              setTimeout(() => {
                hidden.dispatchEvent(new Event("input"));
              });
            });
          }, 300);
        }
      }
    );
    customElements.define(
      "swipper-autoplay",
      class extends HTMLElement {
        connectedCallback() {
          setTimeout(() => {
            const hiddenEditor = this.querySelector("mt-editor-hidden");
            const hidden = hiddenEditor.querySelector(`[name=swipper_autoplay]`);
            const fieldset = this.querySelector("fieldset");
            const radio = fieldset.querySelector(
              `input[value="${hidden.value}"]`
            );
            if (radio) {
              radio.checked = true;
            }
            fieldset.addEventListener("change", (ev) => {
              hidden.value = ev.target.value;
              setTimeout(() => {
                hidden.dispatchEvent(new Event("input"));
              });
            });
          }, 300);
        }
      }
    );
  </script>
</template>

<$mt:Var name="swipper" editor:type="settings" editor:label="スライド設定" editor:description="トップページのイチオシ記事に表示するイメージスライダーの設定です。設定後リロードしてください。"$>
- name="swipper"
変数名を指定します。 - editor:type="settings"
タイプをsettingsに設定。dialogの中に複数のフィールドを入れて表示することができます。
- editor:label="スライド設定"
設定項目のラベルを設定します。 - editor:description="トップページのイチオシ記事に表示するイメージスライダーの設定です。設定後リロードしてください。"
設定項目の説明を記述します。 - <template data-template-name="swipper">~</template>
editor:type="settings"になっている場合は、複数のフィールドをtemplateタグで囲みます。swipperの部分がテンプレートの名前になります。
テンプレート内のソースコード:
<mt:If name="recommend">
<h2 class="swiper__title"><strong>イチオシ</strong>記事</h2>
<mt:If name="is_site_editor">
<template data-template-name="swipper">
  <swipper-loop>
    <h4>最後のスライドまで到達した場合の動作</h4>
    <$mt:Var name="swipper_loop" editor:type="hidden"$>
    <fieldset>
      <label
        ><input
          type="radio"
          name="swipper-loop"
          value="true"
        />最初に戻る</label
      >
      <label
        ><input type="radio" name="swipper-loop" value="false" />戻らない</label
      >
    </fieldset>
  </swipper-loop>
  <swipper-effect>
    <h4>スライドエフェクト</h4>
    <$mt:Var name="swipper_effect" editor:type="hidden"$>
    <fieldset>
      <label
        ><input
          type="radio"
          name="swipper-effect"
          value="slide"
        />スライド</label
      ><br>
      <label
        ><input
          type="radio"
          name="swipper-effect"
          value="fade"
        />フェード</label
      ><br>
       <label
        ><input
          type="radio"
          name="swipper-effect"
          value="cube"
        />キューブ回転</label
      ><br>
       <label
        ><input
          type="radio"
          name="swipper-effect"
          value="coverflow"
        />カバーフロー</label
      ><br>
       <label
        ><input
          type="radio"
          name="swipper-effect"
          value="flip"
        />平面回転</label
      >
      <!-- ここにエフェクトのラジオボックス追加する -->
    </fieldset>
  </swipper-effect>
 <swipper-autoplay>
    <h4>スライダーの自動再生</h4>
    <$mt:Var name="swipper_autoplay" editor:type="hidden"$>
    <fieldset>
      <label
        ><input
          type="radio"
          name="swipper-autoplay"
          value="true"
        />する</label
      >
      <label
        ><input type="radio" name="swipper-autoplay" value="false" />しない</label
      >
    </fieldset>
  </swipper-autoplay>
  <script>
    customElements.define(
      "swipper-loop",
      class extends HTMLElement {
        connectedCallback() {
          setTimeout(() => {
            const hiddenEditor = this.querySelector("mt-editor-hidden");
            const hidden = hiddenEditor.querySelector(`[name=swipper_loop]`);
            const fieldset = this.querySelector("fieldset");
            const radio = fieldset.querySelector(
              `input[value="${hidden.value}"]`
            );
            if (radio) {
              radio.checked = true;
            }
            fieldset.addEventListener("change", (ev) => {
              hidden.value = ev.target.value;
              setTimeout(() => {
                hidden.dispatchEvent(new Event("input"));
              });
            });
          }, 300);
        }
      }
    );
    customElements.define(
      "swipper-effect",
      class extends HTMLElement {
        connectedCallback() {
          setTimeout(() => {
            const hiddenEditor = this.querySelector("mt-editor-hidden");
            const hidden = hiddenEditor.querySelector(`[name=swipper_effect]`);
            const fieldset = this.querySelector("fieldset");
            const radio = fieldset.querySelector(
              `input[value="${hidden.value}"]`
            );
            if (radio) {
              radio.checked = true;
            }
            fieldset.addEventListener("change", (ev) => {
              hidden.value = ev.target.value;
              setTimeout(() => {
                hidden.dispatchEvent(new Event("input"));
              });
            });
          }, 300);
        }
      }
    );
    customElements.define(
      "swipper-autoplay",
      class extends HTMLElement {
        connectedCallback() {
          setTimeout(() => {
            const hiddenEditor = this.querySelector("mt-editor-hidden");
            const hidden = hiddenEditor.querySelector(`[name=swipper_autoplay]`);
            const fieldset = this.querySelector("fieldset");
            const radio = fieldset.querySelector(
              `input[value="${hidden.value}"]`
            );
            if (radio) {
              radio.checked = true;
            }
            fieldset.addEventListener("change", (ev) => {
              hidden.value = ev.target.value;
              setTimeout(() => {
                hidden.dispatchEvent(new Event("input"));
              });
            });
          }, 300);
        }
      }
    );
  </script>
</template>
</mt:If>- <mt:If name="is_site_editor">~</mt:If>
mt:Ifで名前をis_site_editorにすることで、かんたんデザイン編集画面にだけ出力させることができます。